
Introduction
The reliable way to get accurately drilled panels is to design the piece in Cabcode, so the cutting list and the drilling come from the same design. Adding holes to a finished cutting list is not reliable.
We often hear from people with a cutting list who would like drilling added as an extra. It is a reasonable thing to want. Drilled panels go together faster and more accurately, and the hardware fits first time.
This guide explains why drilling can't simply be bolted on to a list of panel sizes, and how Cabcode solves the problem. It also covers what to do if your design seems too bespoke for templates, and the steps from your design to finished panels from a cut-and-edge workshop.
Why drilling can't simply be added to a cutting list
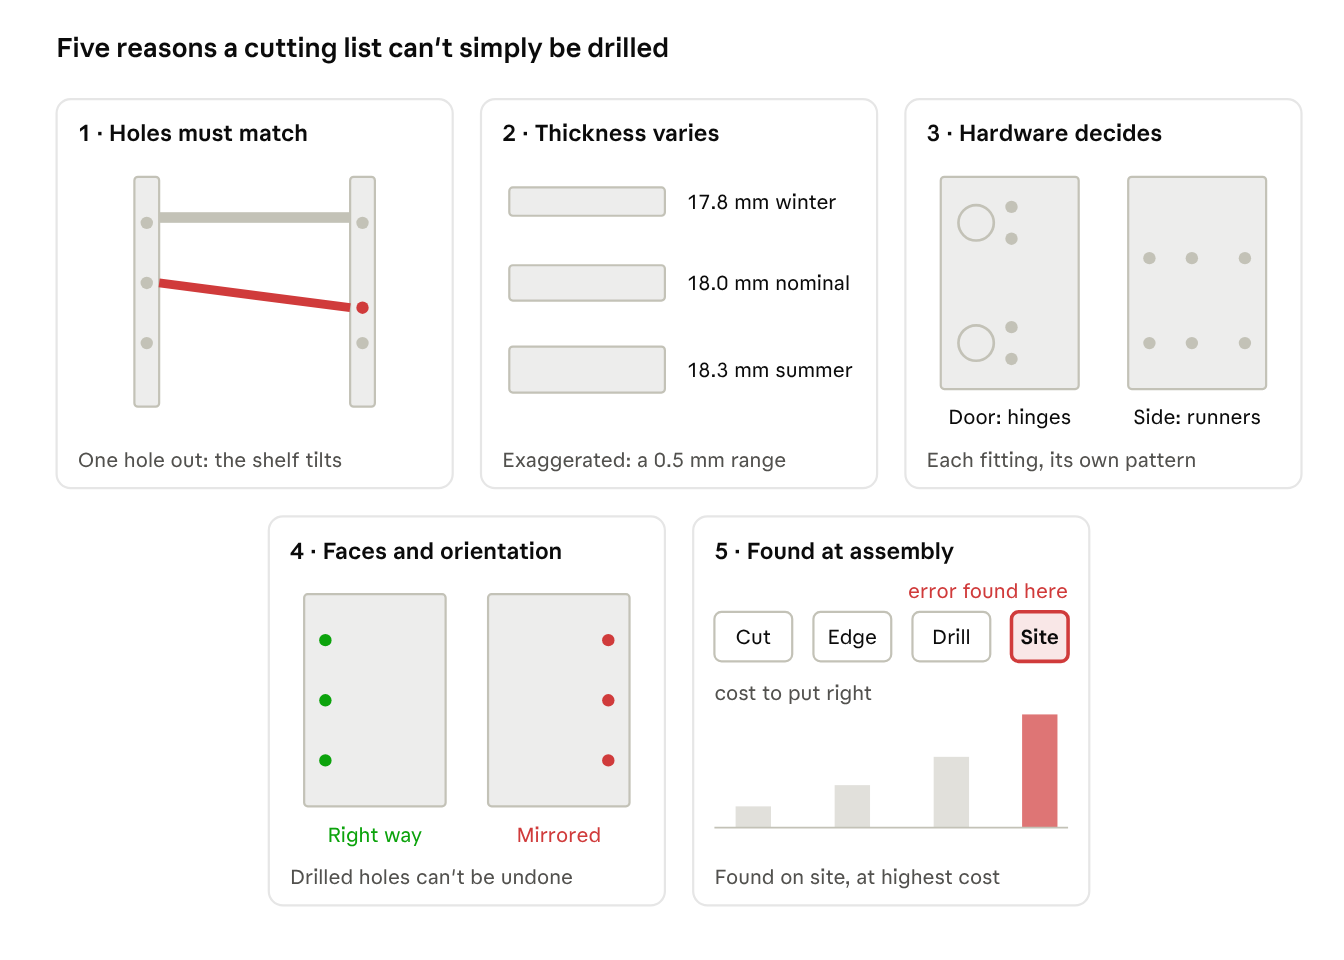
A cutting list says how big each panel is. It doesn't say how the panels go together, and that is exactly what drilling depends on. Five gaps explain why:
- Holes must match across parts. A shelf pin hole in a side panel is only right if the matching hole in the other side is at the same height. A connector in a top only works if the hole in the side meets it. A list of sizes doesn't say which panel joins which, or where.
- Material thickness varies. Board sold as 18 mm is a nominal size. Depending on when it was made, it can measure 18.3 mm in summer or 17.8 mm in winter. How the panels meet has to allow for that, and a list of sizes can't.
- Hardware decides the drilling. Hinge cups, drawer runners and invisible connectors each need their own pattern and clearances. Without the hardware choice, there is no correct pattern to drill.
- Orientation and faces matter. A panel can be drilled on the wrong face or the wrong way round and still look right on the list. Once it's drilled, it can't be undone.
- Errors only show up at assembly. A mismatched hole is found on site, when re-cutting costs the most and holds up the installation.
To drill a cutting list reliably, someone would first have to rebuild the whole design from the sizes. At that point, it is simpler and safer to start from the design itself.
How Cabcode solves it
In Cabcode, the design is the single source. The cutting list, the drilling and the hardware list are all generated from it, so they agree by construction.
- Design, not data entry. You build your piece from Cabcode's parametric templates on cabcode.uk, set the sizes, and see it in 3D. There is no software to install and no CAM for you to do.
- Matching holes are automatic. Cabcode knows which panels meet, so connecting holes are placed as pairs. Where two units share a side panel, each side's drilling is applied to the one shared panel.
- Tolerances are designed in. Cabcode allows for variation in board thickness and in cutting, as the next section explains. Hardware choices also follow thickness rules: invisible connectors such as Lamello Cabineo and Clamex have minimum panel thicknesses.
- Hardware comes with the design. Hinges, drawer runners (Blum and Häfele systems among them) and connectors are chosen in the template. Every design comes with its hardware list.
- The workshop gets ready-to-run programs. Your cut-and-edge workshop receives the cutting list together with matching CNC drilling programs. Nobody has to interpret a drawing or work out hole positions by hand.
The result is panels that go together the way the 3D preview shows, with hardware that fits.
How Cabcode handles tolerances
Bespoke furniture has to fit to within fractions of a millimetre, so Cabcode builds allowances for real materials and machines into every design.
Edging is already in the size. The workshop includes edging in each panel's final overall size. The sizes in your design are the finished sizes, edging included.
Board thickness varies with the seasons. An 18 mm board is a nominal size. Depending on when it was manufactured, it can measure 18.3 mm in summer or 17.8 mm in winter, a range of 0.5 mm. Cabcode allows for this by insetting the top and bottom panels slightly from the ends of the side panels. A thicker or thinner board changes that small inset by a fraction of a millimetre. It never leaves a top or bottom standing proud of the sides.
Cutting has tolerances too. Every saw cuts to within a small tolerance. Cabcode makes tops and bottoms 0.5 mm narrower, front to back, than the side panels, so they sit flush with or just inside the side edges.
For example, assume a cutting tolerance of ±0.25 mm, with sides designed at 560 mm and the top at 559.5 mm:
| Cut (worst case) | Side | Top | Top compared with side |
|---|---|---|---|
| Side cut small, top cut large | 559.75 mm | 559.75 mm | Flush |
| Both cut to size | 560 mm | 559.5 mm | 0.5 mm inside |
| Same worst case, if the top were designed at 560 mm | 559.75 mm | 560.25 mm | 0.5 mm proud |
Why this differs from flat-pack. Mass-market flat-pack makers such as IKEA handle tolerance with gaps of around 2–5 mm. That works for freestanding furniture, but in fitted, made-to-measure work it would show as uneven gaps and lips. Bespoke furniture needs allowances measured in fractions of a millimetre, and Cabcode designs them in.
"My design is too bespoke for templates"
Most bespoke designs turn out to be standard boxes with bespoke sizes, layouts and details, and Cabcode's templates are built to flex around those. Where a design needs something the templates can't yet do, the feature can be added to Cabcode instead of working around it.
Templates are parametric, not fixed. Every template takes your own height, width and depth. The catalogue has more than 100 templates, from single panels to complete units. It covers kitchens, wardrobes and walk-in wardrobes, drawer packs, larders, bookshelves, media walls, sideboards, bathroom and utility cabinets, angled and corner units, and fully customisable cabinets. They draw on more than ten years of making made-to-measure furniture for customers.
Resolving a design means breaking your piece into the units and panels it's made of, then matching each to a template:
- Split the design into boxes. A media wall might be a run of base units, some open compartments and a few end panels.
- Match each box to the closest template, such as a two-space cabinet, a drawer pack or a grid of compartments.
- Set the sizes and choose the hardware and options for each.
- Add the panels that tie it together: end panels, scribes, plinths, worktops and floating shelves are all templates too.
When something is genuinely new, for example a detail or hardware the catalogue doesn't cover, tell us. Real customer requirements are how the catalogue has grown, and new features are added to bring in the level of customisation a project needs. Once added, a feature is drilled with the same reliability as everything else.
Worked example: a walk-in dressing room from C332
Job 31367 shows a bespoke piece built up from a standard template. It started as C332, a two-by-two grid of compartments above one full-width compartment, and was set to the room's height.
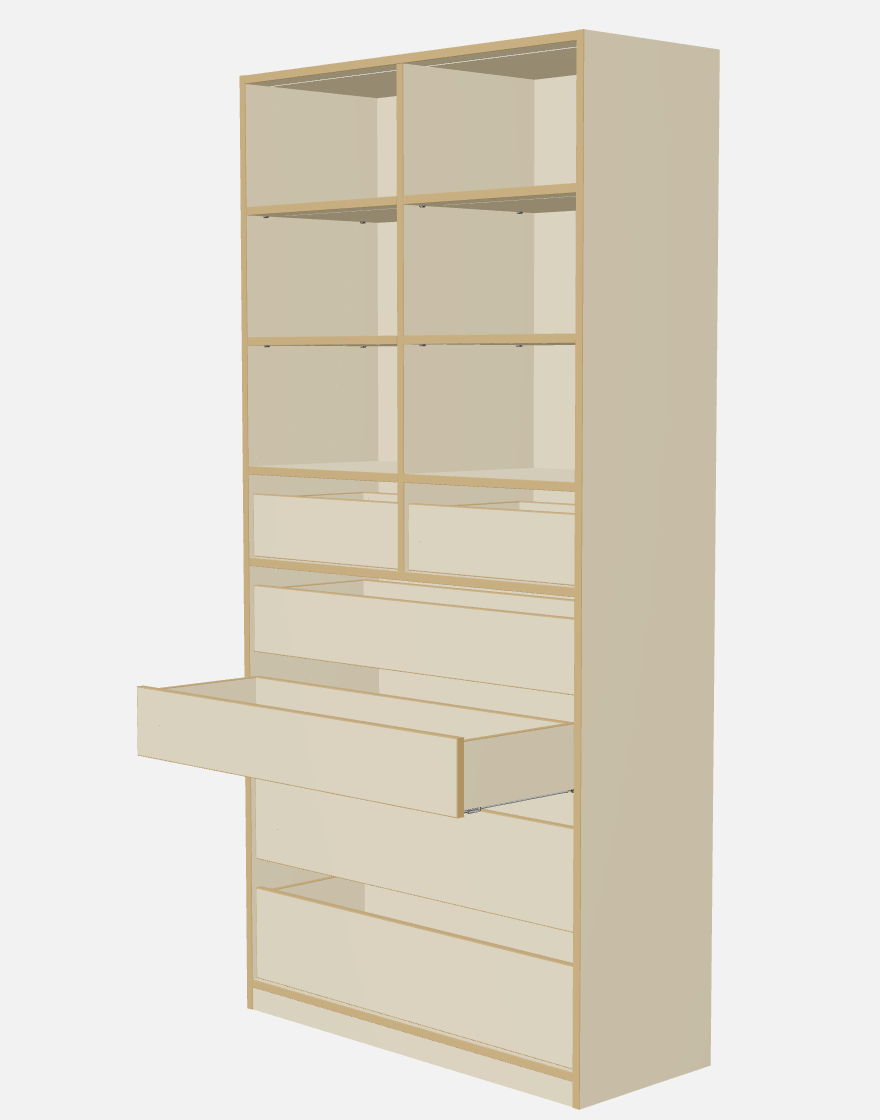
Starting template: C332 (view C332 in 3D)
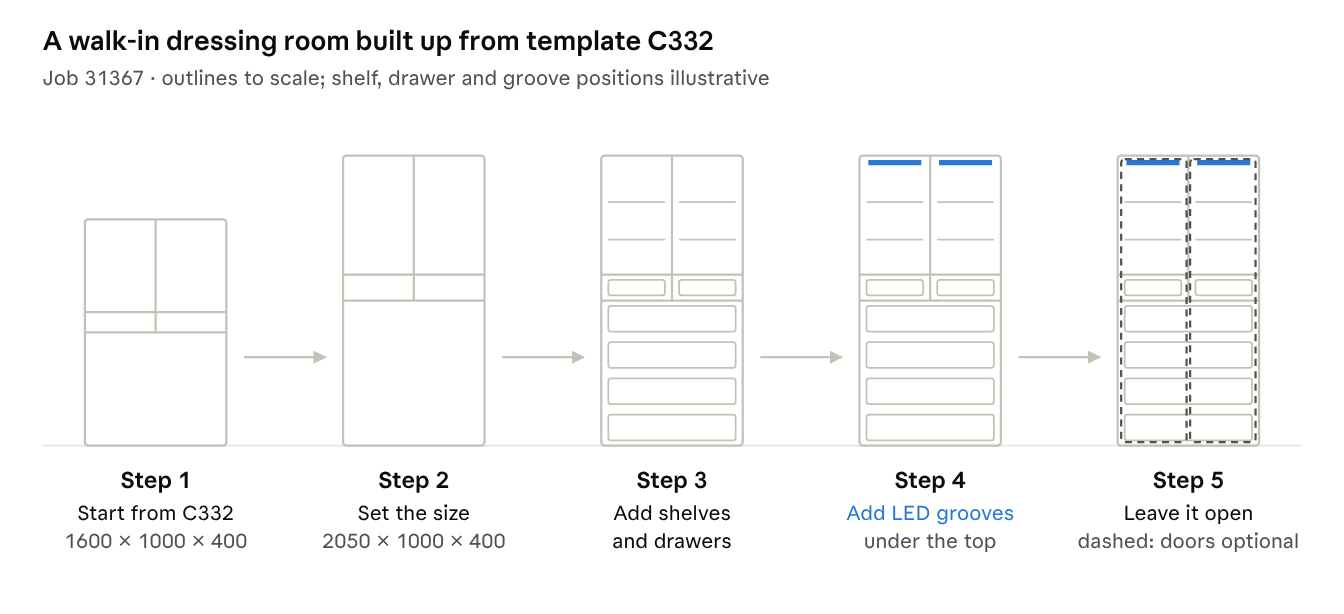
- Start from the closest template. C332 already has the right layout: a two-by-two grid above one full-width space. Its default size is 1600 × 1000 × 400 mm.
- Set the sizes. The height goes up to 2050 mm. The width (1000 mm) and depth (400 mm) stay at the default. Every panel, and its drilling, resizes with the design.
- Add shelves and drawers. Each tall upper compartment gets two adjustable shelves. The lower row of the grid takes one drawer per column, and the full-width section below takes four wide drawers. The runner and shelf-pin drilling is generated with them.
- Add LED grooves. Grooves under the top panel take LED strip lighting, so each upper compartment is lit and the strip sits flush.
- Choose the front. Double doors could be added. For a walk-in dressing room, the unit is left open so everything is in view and easy to reach.
Step by step: from your design to drilled panels
There are six steps from what you have now to panels ready to assemble. You do the design, and the workshop does the manufacturing.
- Share what you have. A cutting list, sketch, SketchUp model or drawing is a good starting point. Send it to us and we'll advise how it maps onto Cabcode.
- Resolve the design into templates. Break it into units and panels and match each to a template (see above). We can help with this on your first project.
- Build and check it on cabcode.uk. Set the sizes, hardware and options, then check the 3D preview. This is the moment to catch mistakes, while they cost nothing.
- Save and order. Saving the design creates an order page where you review the job and confirm your details. Nothing is manufactured until you order.
- The workshop cuts, edges and drills. Your cut-and-edge workshop receives the cutting list and matching CNC drilling programs, and makes the panels. If they have a question, they contact us before cutting.
- Assemble. Panels arrive drilled for their hardware and connectors, with the hardware list to match.
What to prepare, and common questions
Before you start, have ready:
- the overall sizes of each piece, and the space it fits into;
- the board you want: material, thickness and finish;
- your hardware preferences, if any (hinges, drawer runners, handles or handleless);
- your existing cutting list or drawings, for reference.
Can I just send my cutting list and have it drilled? Not reliably. A cutting list doesn't say how the parts join, so the drilling can't be checked. Once the design is in Cabcode, the cutting list is regenerated from it, and the drilling is guaranteed to match.
How are material and manufacturing tolerances handled? The workshop includes edging in each panel's final size. Variation in board thickness and in cutting is allowed for: tops and bottoms are inset from the ends of the sides, and made 0.5 mm narrower than the sides. See "How Cabcode handles tolerances" above.
My design doesn't fit any template. What now? It usually fits several, once it's broken into units. If a detail is genuinely new, tell us. New features are added in response to real project needs.
Do I need any software? No. Everything runs in your browser on cabcode.uk, and there is no CAM for you to do.
Which workshop makes it? Cabcode works with experienced cut-and-edge workshops. We can recommend one for your project.
Next steps
Send us your cutting list or drawings with a short description of the project, and we'll show you how it maps onto Cabcode.
Contact: drilling@cabcode.uk · @cabcodeuk on Instagram